Net Promoter Score (NPS) surveys have emerged as a game-changer in the world of customer loyalty measurement. With their ability to provide valuable insights into your brand, company, product, or service, NPS surveys help ensure customer retention and enhance brand advocacy.
Creating an NPS survey may seem like a daunting task at first, but it doesn't have to be. By following a few simple steps, you can set up an NPS survey that effectively measure loyalty at all touchpoints in the customer journey and prevent churn.
This article will walk you down the process of creating Net Promoter Score surveys, how you can distribute them effectively along the user journey, and take feedback-based actions to enhance overall loyalty, retention, and advocacy.
TL;DR
- NPS is a customer satisfaction metric that helps assess customer loyalty and refine the customer experience by pinpointing strengths, patterns, and areas needing improvement.
- With a survey software like Zonka Feedback, you can create an NPS survey from scratch or use the pre-existing templates to set-up the surveys in minutes. You can edit the questions, white-label the surveys, and customize every element based on your requirement.
- You can track NPS in-app, on website, through emails, on tablets, survey kiosks, offline, and more. All you need is distribute the surveys through the right survey channels based on their latest interaction and capture customer loyalty.
- You can automate actions like follow-up emails triggered by response categories and automated replies tied to NPS ratings, thus, closing the feedback loop.
- Zonka Feedback is a leading survey software with key focus on Net Promoter Score. You can sign up for a 14-day free trial or book a demo to explore this NPS platform.
Measure Customer Loyalty with NPS Surveys
With Net Promoter Score surveys, understand what users need and learn ways to boost loyalty and prevent churn.

What is a Net Promoter Score Survey?
The Net Promoter Score (NPS) is the leading customer feedback metric that was incorporated by the leading management consulting firm Bain & Company. It is used to measure the loyalty of your customers and employees towards your brand, company, product, or service.
Net Promoter Score is measured from the simple NPS question
“How likely would you be to recommend [YOUR COMPANY/PRODUCT/SERVICE] to a friend?”.
This is rated on a scale of 0-10.
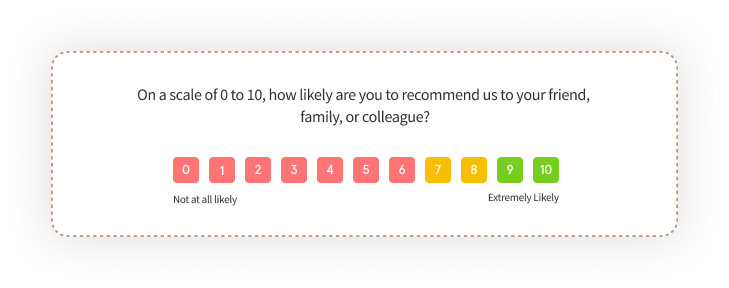
Based on their responses, customers will be segregated into 3 categories:
- Detractors (0-6): Detractors are those that rate between 0 to 6 on the NPS question and are likely to be disloyal to the brand.
- Passives (7-8): Passives are those that rate 7 or 8 on the NPS question and are said to be neither loyal nor disloyal to the brand and company.
- Promoters (9-10): Promoters are loyal customers who rate 9 or 10 on the NPS question. They are said to promote the brand to others.
In an NPS survey question, customers rate their willingness to recommend you on a scale of 0-10. The Net Promoter Score calculated based on the rating ranges from -100 to 100. The Net Promoter Score is not a percentage.
How to Set up an NPS Survey?
When it comes to measuring customer loyalty and gathering valuable insights into your brand, product, or service, setting up an NPS survey can be a powerful approach. But how exactly do you create an NPS survey?
Let's explore the step-by-step process to help you get started.
1. Crafting an NPS Survey from Scratch
Creating an NPS survey from scratch may initially seem overwhelming, but with the right approach and guidance, it can become a straightforward and effective method to measure customer loyalty. By following a few simple steps, you can gain valuable insights into your customers' perceptions of your brand, company, product, or service.
Step 1: Create your Zonka Feedback Account
Sign up for Zonka Feedback in less than a minute. Once you sign up for a free trial, you can access all the features for 7 days. You'll be now directed to the dashboard.
Step 2: Creating an NPS Survey
The first step once you're inside the platform is to create your NPS survey so you can start collecting feedback and conducting surveys.
- On the dashboard, find the "Add Survey" button and click on it.
- You’ll be redirected to the Zonka Feedback Template library which has over 100+ survey templates.
- Instead of templates, opt for the "Start From Scratch" option.
Step 3: Adding the NPS question
When you add the NPS question it will automatically draft a question “How likely are you to recommend us to your friends and colleagues?” However, you can modify the question based on your preferences.
Step 4: Adding Follow-Up Questions
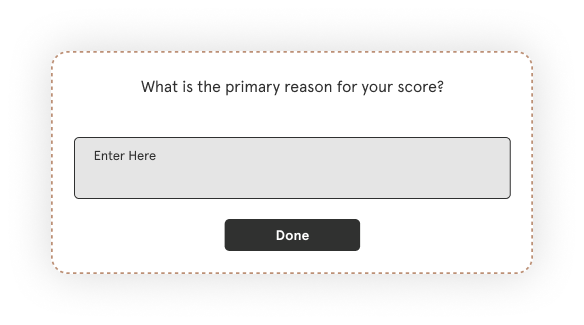
- You can add follow-up questions to gain deeper insights into customer responses.
- Consider asking an open-ended question to understand the reason behind the NPS score or offering options for improvement.
Step 5: Adding Logic
- You can add survey logic and branching rules that trigger certain actions based on respondents' answers.
- For example, you can create logic to show a different question if the NPS score is below a certain threshold.
Step 6: Customizing Survey Design
- Customize the survey design to align with your brand identity.
- Add your company logo, choose colors, and select fonts that reflect your brand's personality.
By following these steps and approaching the creation of your NPS survey with careful consideration, you can unlock valuable insights into customer loyalty. Armed with this information, you can make informed decisions and take targeted actions to improve your brand, company, product, or service.
2. Designing an NPS Survey using Templates
Designing an NPS survey with the help of templates can save you time and effort, while also ensuring that you gather valuable insights into your customers' perception of your brand, company, product, or service. Templates provide a structured framework that you can customize to suit your specific needs, making the process of creating an NPS survey straightforward and effective.
Step 1: Create your Zonka Feedback Account
After completing a quick and easy sign-up process for Zonka Feedback, you will gain immediate access to all the features for a 7-day free trial. Once signed up, you will be directed to the user-friendly dashboard where you can begin creating your NPS survey using the templates.
Step 2: Creating an NPS Survey
Upon entering the platform, your first task is to construct your NPS survey, which will enable you to gather feedback and carry out surveys effectively.
- On the dashboard, find the "Add Survey" button and click on it.
- You’ll be redirected to the Zonka Feedback Template library which has over 100+ survey templates.
Step 3: Choosing a Template
- Browse through Zonka Feedback's collection of survey templates.
- Select the "NPS" template that aligns with your objectives.
- Alternatively, you can directly start using the survey template given below.
Step 4: Customizing the Template
- The NPS template will come with the standard NPS question, but you can modify it to suit your needs.
- The standard NPS question is: "On a scale of 0 to 10, how likely are you to recommend our product/service to a friend or colleague?"
- Feel free to personalize the question and add any follow-up queries that can provide deeper insights into customer responses.
Step 5: Adding Follow-Up Questions
- You can add follow-up questions to gain deeper insights into customer responses.
- Consider asking an open-ended question to understand the reason behind the NPS score or offering options for improvement.
Step 6: Adding Logic
- You can add logic rules that trigger certain actions based on respondents' answers.
- For example, you can create logic to show a different question if the NPS score is below a certain threshold.
Step 7: Customizing Survey Design
- Customize the survey design to align with your brand identity.
- Add your company logo, choose colors, and select fonts that reflect your brand's personality.
By following these steps and utilizing the templates and features provided by Zonka Feedback, you can easily create an NPS survey that gathers valuable insights into customer loyalty. This data will enable you to make informed decisions and take actions that will enhance your brand, company, product, or service.
Distributing your NPS Survey
With Zonka Feedback, you can collect responses on emails, SMS, Mobiles and tablets, QR codes, Web links, Websites, in-products, Slack, Microsoft Teams, all major Customer Relationship Management tools, enterprise-related products, and Helpdesk systems.
- Send Email Survey invitations, email signature surveys, embedded surveys, and more to your customers.
- Trigger SMS Surveys to customers on their Mobile Devices via SMS and gather information, capture feedback, and measure customer experience.
- Conduct surveys on Mobile and Tablet Applications in Both Android and IOS Devices for on-the-go surveys, do market research, and take on-premises, in-moment feedback from customers.
- You can collect data, and measure satisfaction at various online touch points on your Website and in your product application with the help of website surveys in form of pop up, pop over, side tab, bottom bars and slide outs.
- Integrate and collaborate with the best survey apps and reduce the time of your data syncing across different tools to manage your audience and business.
Setting up workflows for NPS
Setting up workflows for NPS is a crucial step in effectively utilizing the Net Promoter Score metric. By automating certain actions based on customer responses, you can streamline your processes and ensure timely and personalized communication with your customers.
1. CX Automation with Workflow
Workflow Actions are the set of activities that will be executed automatically when the trigger conditions are met.
- Email to Respondent- You can set up email workflows and trigger them based on the responses of the NPS (Detractors, Passives, Promoters) to respondents automatically. You can also customize the body of the email according to what you want to include.
For example: As soon as a promoter responds to the survey, send them a personalized thank you message. Express your appreciation for their positive feedback and their loyalty. - Email to Team- You can set up email workflows and trigger them based on the responses of the NPS (Detractors, Passives, Promoters) to your team members/colleagues automatically. You can notify your team members by using this workflow.
For example: As soon as a detractor response is received, set up an automatic notification to alert your customer support team. This ensures a swift response and demonstrates your commitment to addressing their concerns promptly.
If you want to learn more about CX Automation workflows and want to set up that in your account. Please take a look at this article on How to create workflows.
2. CX Automation with Auto Responder
You can set up automated replies with the help of a program that automatically generates a set response to all or selective survey responses based on the Net Promoter Score.
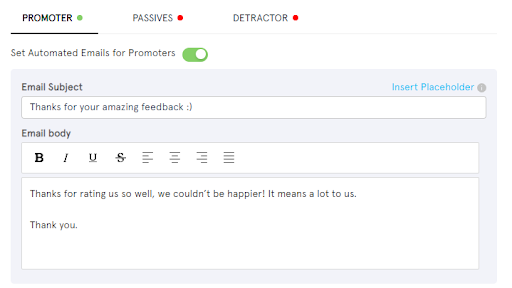
- Send Automated Emails for Promoters: You can set up an automatic response for the positive feedback you have received.
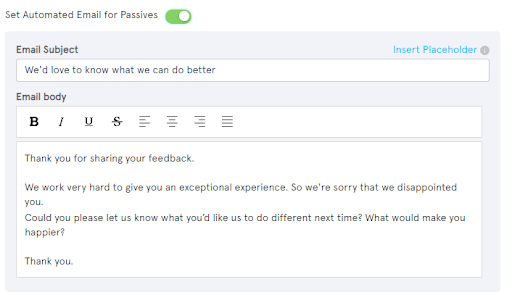
- Send Automated Emails for Passives: You can set up an automatic response for the feedback you have received from passives.
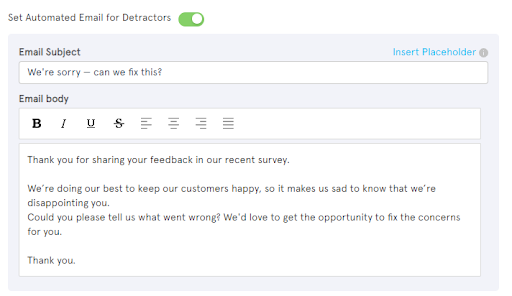
If you want to learn more about CX Automation with Auto Responder and want to set up that in your account. Please take a look at this article on How to set up Auto-Responders.
What’s next? Let’s Analyze NPS responses
As responses come in, Zonka Feedback compiles the data into an easy-to-understand dashboard. It automatically organizes all the collected data and gives you robust reports, graphs, and tablets to extract meaningful insights.
- Now that you’re all set up with your survey, you may want to manage the responses and act on them. You can read through this article to know all the features of your responses inbox.
- Well when your response inbox gets too crowded, you may want to analyze them with our real-time reports and analytics based on response tags, CX metrics, and questions and identify trends and gaps.
- Don't want to manually go through each response and take action on it? Automate it with workflows, auto-responders, and auto-tagging features of Zonka Feedback.
Loop in your team with Alerts, Digests and Reports
With Zonka Feedback’s NPS Survey Platform, notify your team instantly for every feedback to enable quick action.
- Real-time Alerts and Notifications: Send instant alerts about detractors to your CX team, and promoters to your marketing team via email, SMS, and Slack.
- Daily, Weekly, Monthly Digests: Schedule Daily, Weekly, or Monthly Response Digests with a summary of all NPS responses, and Net Promoter Scores trends.
- Saved and Scheduled Reports: Build your own NPS Reports and save them for quick access. Schedule them to be delivered to your mailbox at regular intervals.
Close the Feedback Loop
Zonka Feedback allows you to take action, prevent churn, and make customers your advocates by assessing their issues and helping you close the feedback loop. With Zonka Feedback’s NPS Survey Software, notify your team instantly for every feedback to enable quick action
- Apologize to Detractors & Prevent Churns: Reach out to detractors immediately, apologize for their experience, take action and prevent customer churn
- Get Suggestions from Passives: Reach out to Passives to get their suggestions about how you can do better. Make improvements, follow up, and turn them into promoters.
- Turn Promoters into Advocates & Influencers: Thank promoters for their score and request them for online reviews, recommendations, and testimonials.
Creating an NPS survey in Zonka Feedback empowers businesses to gain valuable insights into customer sentiments, enabling them to make informed decisions and drive growth. By following the simple steps outlined in this guide, you'll be well-equipped to create, distribute, and analyze NPS surveys effectively.
To create your NPS survey, you can sign up for a free 14-day trial with Zonka Feedback and explore all the features and options that the tool has to offer.


.jpeg?width=150&height=150&name=casual%20photograph%20(1).jpeg)


.png)


.jpg)
.jpg)
.jpg)

.jpg)